Composting 101: Turn Food Waste into Nutrient-Rich Soil in Just 3 Months

Composting 101 guides beginners through transforming food waste into nutrient-rich soil in only three months, providing essential steps and practical tips for a sustainable lifestyle and healthier gardens.
Diving into the world of gardening and sustainable living often leads to discovering remarkably effective practices. For many, one such practice stands out: composting. The idea of transforming kitchen scraps and yard waste into a dark, crumbly, nutrient-packed amendment for your garden can seem daunting at first, yet it’s surprisingly accessible. This guide, Composting 101: Turn Food Waste into Nutrient-Rich Soil in Just 3 Months, aims to demystify the process, demonstrating how easily you can contribute to a healthier planet while enhancing your gardening efforts.
Understanding the ABCs of Composting: What It Is and Why It Matters
Composting is more than just throwing your food scraps into a pile; it’s a carefully orchestrated natural process where organic materials decompose into a rich soil amendment. This transformation, driven by microorganisms, earthworms, and other beneficial critters, yields a product often called “black gold” due to its incredible benefits for plants and soil structure.
The Core Benefits of Composting
The act of composting offers a multitude of environmental and practical advantages. Understanding these benefits can significantly enhance your motivation to start and maintain a composting regimen. Beyond simply reducing waste, the impact on your garden and the broader ecosystem is profound.
- Waste Reduction: Diverts organic materials from landfills, where they would otherwise produce methane, a potent greenhouse gas.
- Soil Enrichment: Adds vital nutrients and beneficial microorganisms to the soil, improving its structure, fertility, and water retention capacity.
- Reduced Chemical Use: Lessens the need for synthetic fertilizers and pesticides, fostering a healthier, more sustainable garden ecosystem.
The Environmental Impact of Organic Waste
Landfills are rapidly filling, and a significant portion of what ends up there is organic waste, including food scraps and yard trimmings. When these materials decompose in anaerobic (oxygen-poor) conditions within landfills, they generate methane. This gas is far more effective at trapping heat in the atmosphere than carbon dioxide over a 100-year period, making it a critical contributor to global warming. By composting, you directly mitigate this issue, participating in a circular economy that values waste as a resource. It’s a simple, yet powerful, step towards environmental stewardship.
While the primary goal is often enriching garden soil, the broader environmental implications are equally compelling. Composting supports biodiversity by creating healthier soil environments, which in turn fosters stronger plants and ecosystems. It’s a foundational practice for anyone looking to live more sustainably and reduce their ecological footprint. The journey from waste to resource is not only satisfying but profoundly impactful.
Getting Started: Essential Tools and Where to Compost
Embarking on your composting journey requires just a few basic considerations regarding tools and location. You don’t need a sprawling backyard or expensive equipment to begin; even small spaces can accommodate effective composting setups. The key is choosing a method that suits your living situation and lifestyle.
Choosing Your Composting Method
The “right” composting method depends on factors like space, volume of waste, and desired speed. Each method has its quirks and benefits.
- Bins and Tumblers: Ideal for smaller backyards or those wanting neat, contained systems. Tumblers allow for easy turning, speeding up decomposition.
- Piles: Best for larger quantities of yard waste and food scraps, requiring more space but offering simplicity. Can be open or contained by wire mesh.
- Vermicomposting (Worm Composting): Perfect for indoor composting or small apartments. Uses specialized worms (red wigglers) to break down food waste.
Selecting the Ideal Spot for Your Compost
Location is crucial for both convenience and successful decomposition. A well-chosen spot can prevent issues like odors and ensure optimal conditions for your compost pile or bin.
It’s often recommended to place your compost bin or pile in a shaded or partially shaded area. Direct, harsh sunlight can dry out the pile too quickly, hindering microbial activity. Conversely, a spot that’s too damp or prone to waterlogging can lead to anaerobic conditions and unpleasant smells. Aim for a location that is easily accessible from your kitchen for food scraps and from your garden for mixing and applying the finished compost. Proximity to a water source is also beneficial, as you’ll occasionally need to moisten your pile. Avoid placing compost directly against wooden structures or near foundations, as moisture can cause damage over time.
Ensuring good air circulation around your compost setup is also vital. This helps maintain aerobic conditions, which are key to efficient, odor-free decomposition. Whether you opt for a simple pile or a sophisticated tumbler, a thoughtful approach to location planning will set you up for success.
The “Green” and “Brown” of Composting: Balancing Your Materials
Successful composting hinges on understanding the critical balance between “greens” and “browns.” These terms refer to the nitrogen-rich and carbon-rich materials, respectively, that form the backbone of a healthy compost pile. Getting this ratio right is fundamental for rapid and efficient decomposition.
Understanding “Greens” (Nitrogen-Rich Materials)
Green materials are typically fresh, moist, and high in nitrogen. They are the protein source for the microorganisms that drive decomposition, fueling their growth and activity. Think of them as the activators of your compost pile.
- Food Scraps: Fruit and vegetable peels, coffee grounds, tea bags, leftover bread.
- Grass Clippings: Freshly cut grass is a potent source of nitrogen.
- Plant Trimmings: Green plant cuttings, spent flowers, and weeds (preferably without seeds).
Understanding “Browns” (Carbon-Rich Materials)
Brown materials are dry, often woody, and high in carbon. They provide the energy source and structure for the compost pile, preventing compaction and ensuring good air circulation. Without a sufficient amount of browns, your pile can become slimy, compact, and smelly.
- Leaves: Dried leaves, especially from deciduous trees.
- Wood Chips and Sawdust: untreated wood only.
- Shredded Paper/Cardboard: Newspaper, plain cardboard (no glossy inks or plastic coatings).
The Ideal Green-to-Brown Ratio
A common guideline suggests a ratio of approximately 1 part green to 2-3 parts brown by volume. This ratio provides the ideal chemical environment for microorganisms to thrive, leading to rapid breakdown of materials. Too many greens can make the pile slimy and odorous, signaling a lack of carbon. Conversely, too many browns will slow down the composting process considerably because the microorganisms lack sufficient nitrogen to multiply and break down the carbon. Experimentation may be necessary to find your ideal balance, as the moisture content and specific composition of your materials will vary. Regularly turning your pile (mixing it) helps distribute these materials evenly and aerate the compost, further accelerating decomposition.
Maintaining this balance ensures that your compost pile heats up properly, a sign of active decomposition, and avoids common composting problems. When in doubt, err on the side of adding more browns to prevent odor issues.
Building Your Compost Pile Step-by-Step for Success
Constructing a new compost pile isn’t rocket science, but a strategic approach can significantly speed up the decomposition process and ensure a healthy, productive pile. Think of it as creating a favorable habitat for the tiny decomposers poised to do the work.
Starting Your Pile Right
A strong foundation sets the stage for a well-aerated and efficient compost pile. Begin by laying down a base of coarse, bulky brown materials. This initial layer ensures good airflow at the bottom, preventing saturation and improving drainage, which are critical for aerobic decomposition.
For the base, consider using materials like small branches, twigs, or wood chips. This “loose” layer roughly 4-6 inches deep acts as a natural aeration system. On top of this, you can start adding alternating layers of browns and greens, maintaining the roughly 2-3 parts brown to 1 part green ratio. Each layer should be around 4-6 inches thick. As you add new materials, sprinkle in a bit of existing soil or finished compost if you have it; this introduces beneficial microorganisms that jumpstart the decomposition.
Layering and Maintenance for Optimal Results
Consistent layering is key to a balanced and active compost pile. Don’t just dump all your greens on top; integrate them with browns. Adding a sprinkle of water as you layer, especially if materials are dry, helps maintain the ideal moisture level—your compost should feel like a wrung-out sponge. If it’s too dry, decomposition will slow down; too wet, and it might become anaerobic and smelly.
As you continue to add materials, remember the importance of turning the pile. Turning aerates the compost, distributes moisture and microorganisms, and helps regulate temperature. For rapid composting, turning every few days to once a week is ideal, especially when the pile is actively heating up. This simple act can dramatically reduce the time it takes to produce finished compost. Monitor the temperature—a hot pile (around 130-160°F or 55-70°C) indicates vigorous microbial activity. A good strategy is to keep a pitchfork or aeration tool near your compost bin for easy access.
Troubleshooting Common Composting Problems: Smell, Slowness, and Pests
While composting is generally straightforward, beginners might encounter a few common hiccups. Understanding how to diagnose and fix these issues can save you frustration and keep your compost pile thriving. Most problems stem from an imbalance in the “green-to-brown” ratio, improper moisture, or insufficient aeration.
Dealing with Unpleasant Odors
A healthy compost pile should have an earthy, pleasant smell, similar to forest soil. If your compost smells putrid, like rotten eggs or ammonia, it’s a clear sign of an imbalance.
The most common culprit for bad odors is too much nitrogen (greens) and not enough carbon (browns), leading to anaerobic conditions due to excessive moisture and compaction. To remedy this, simply add more brown materials like dry leaves, shredded newspaper, or wood chips. Mix them thoroughly into the smelly areas of the pile. Turning the pile vigorously also introduces oxygen, helping to dry out overly wet spots and encouraging aerobic decomposition, which typically produces no strong odors. Think of it as adding “breathing room” to your mixture.
When Your Compost Pile is Too Slow or Cold
A compost pile that isn’t heating up or breaking down quickly often indicates a lack of microbial activity. This can be due to several factors, including insufficient nitrogen, too much carbon, or insufficient moisture.
If your pile is cold and slow, first check its moisture content. If it’s too dry, dampen it thoroughly, turning as you water to ensure even distribution. Next, assess your green-to-brown ratio. A lack of greens (nitrogen) will starve the microorganisms. Add more fresh food scraps, grass clippings, or other nitrogen-rich materials, and turn the pile to mix them in. Small pieces compost faster than large ones, so chopping materials before adding them can also accelerate the process. Remember, a certain mass is needed for the pile to generate significant heat; very small piles may struggle to get hot.
Managing Pests and Critters
While a healthy compost pile primarily attracts beneficial microorganisms, improper management can draw unwanted pests like rodents or insects. This concern is often easily preventable.
Pests are typically attracted by exposed food scraps, especially meat, dairy, and oily foods, which are generally not recommended for home composting due to their slow decomposition and potential to attract undesirable visitors. To prevent pests, bury fresh food scraps deep within the compost pile, ensuring they are covered by at least 6-8 inches of brown material.
- Avoid adding: Meat, dairy products, bones, oily foods, and pet waste. These attract pests and can introduce pathogens.
- Cover food scraps: Always bury newly added food waste deep within the pile to deter rodents and flies.
- Maintain balance: A hot, actively decomposing pile is less inviting to pests. Ensure a good carbon-to-nitrogen ratio and proper aeration.
By addressing these common issues promptly, you can maintain a happy, healthy compost pile that efficiently transforms your waste into valuable soil amendment.
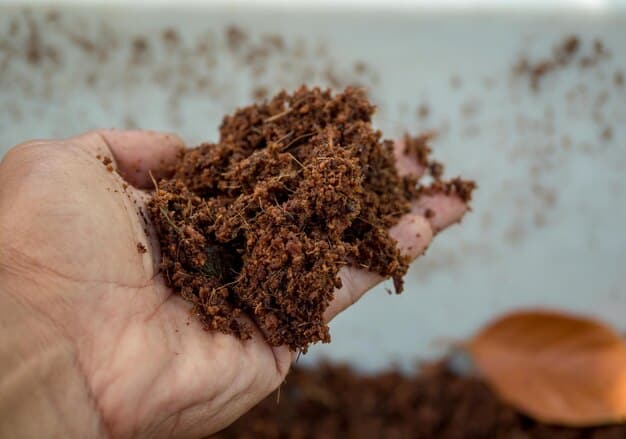
Harvesting Your Black Gold: How to Know When It’s Ready
The moment you’ve been waiting for: the transformation of your kitchen scraps and yard waste into rich, dark compost. Knowing when your “black gold” is ready is crucial for maximizing its benefits in your garden. While there’s no single perfect date, several indicators signal maturity.
Signs of Finished Compost
Finished compost possesses distinct characteristics that differentiate it from raw organic matter. Its appearance, texture, and smell are the primary indicators of readiness.
Firstly, mature compost should have a uniform, dark brown to black color. You shouldn’t be able to easily identify the original materials like banana peels or leaves; they should have broken down completely into a homogeneous mass. Secondly, its texture should be crumbly, loose, and feel like rich soil. It should also be cool to the touch, indicating that the intense microbial activity that generates heat has subsided. Lastly, and perhaps most importantly, finished compost should have a pleasant, earthy smell, reminiscent of forest floor—not sour, ammoniacal, or rotten. If it still smells like decaying food, it needs more time.
If any large, identifiable pieces remain (like avocado pits or thicker branches), you can either screen them out and return them to the active compost pile for further decomposition or simply leave them in if you don’t mind a few larger chunks in your garden.
Using Your Nutrient-Rich Compost
Once your compost is ready, it’s time to unleash its power in your garden. This nutrient-rich amendment can be used in countless ways to enhance plant health and soil vitality.
- Soil Amendment: Mix 1-2 inches of compost into your garden beds before planting. This improves soil structure, drainage, and water retention, while slowly releasing nutrients.
- Top Dressing: Spread a thin layer of compost (about 1/2 inch) over garden beds or around the base of plants. This provides a slow-release fertilizer and helps suppress weeds.
- Potting Mix: Incorporate compost into your homemade potting mixes for container plants. A common ratio is 1 part compost to 2 parts native soil or growing medium.
- Lawn Care: Spread a thin layer of screened compost over your lawn, then rake it into the grass. This enhances turf health and reduces the need for chemical fertilizers.
Compost is a gentle, natural fertilizer, meaning it’s unlikely to burn plants, unlike some synthetic options. Its gradual release of nutrients fosters long-term soil health rather than providing a quick, ephemeral boost. Applying finished compost regularly will transform your garden into a vibrant, robust ecosystem.
Beyond the Basics: Advanced Tips for a Composting Pro
Once you’ve mastered the fundamentals of composting, there are several advanced techniques and considerations that can further refine your process, making it even more efficient, sustainable, and productive. These tips aim to help you troubleshoot, optimize, and expand your composting horizons.
Speeding Up Decomposition
While composting typically takes 3 months or more, you can accelerate the process. One common method is called “hot composting,” which involves meticulous management of the carbon-to-nitrogen ratio, moisture, and frequent turning to maintain high temperatures (130-160°F or 55-70°C). Smaller pieces of material decompose faster, so chopping or shredding your greens and browns before adding them can significantly reduce composting time. Using a dedicated compost thermometer helps monitor the internal temperature. Additionally, certain “compost activators” (often high-nitrogen materials like alfalfa meal or comfrey leaves) can jumpstart microbial activity.
Composting in Different Climates and Seasons
Composting can be done year-round, but approach it differently depending on your climate and the season. In colder climates, decomposition slows significantly or halts during winter. You can build a large, insulated pile to maintain heat, or simply continue adding materials, knowing that decomposition will resume in spring. In hot, dry climates, moisture management becomes paramount. Shade your compost pile to prevent excessive drying, and be prepared to water it more frequently. In rainy seasons, ensure your compost pile has adequate drainage and perhaps a cover to prevent waterlogging, which can lead to anaerobic conditions. Adjustable bins or tarps can be invaluable for moisture control.
Expanding Your Composting Repertoire
Beyond basic kitchen and yard waste, consider diversifying your composting inputs. You can compost untreated wood ashes (in moderation, as they are alkaline), hair (human or pet, if free of chemicals), and even dryer lint (from natural fibers). For those with specific agricultural needs, creating specialty composts, like worm castings from vermicomposting or specific blends for acid-loving plants, can take your gardening to the next level. These more advanced techniques can turn composting from a simple waste management practice into a refined art form, allowing you to fine-tune the nutrient content and characteristics of your soil amendments.
| Key Point | Brief Description |
|---|---|
| 🌱 Green & Brown Balance | Essential 1:2-3 ratio (nitrogen to carbon) for rapid decomposition. |
| 💧 Moisture & Aeration | Keep pile damp, like a wrung-out sponge; turn regularly for oxygen. |
| ⏱️ 3-Month Goal | Achieve nutrient-rich soil by managing heat, material size, and turning. |
| ✨ “Black Gold” Benefits | Enrich soil, reduce waste, cut chemical use, enhance plant growth. |
Frequently Asked Questions about Composting
Avoid composting meat, dairy products, bones, oily foods, and pet waste. These items can attract pests like rodents and flies, produce foul odors, and may contain harmful pathogens that home composting systems typically cannot break down effectively.
For rapid composting, turn your pile every few days to once a week, especially when it’s actively heating up. If you’re not in a hurry, turning it every 2-4 weeks is sufficient. Regular turning aerates the mixture, prevents compaction, and distributes heat and moisture evenly.
Yes, absolutely! Vermicomposting (worm composting) is an excellent method for small spaces, including apartments. It uses specialized worms (red wigglers) in a contained bin to efficiently break down food scraps into nutrient-rich castings with minimal odor or hassle.
Your compost pile should ideally be as damp as a wrung-out sponge. If it’s too dry, decomposition will slow down significantly. If it’s too wet, it can become anaerobic and smelly. Simply add water or dry brown materials as needed to adjust.
While this guide focuses on achieving results in 3 months, the actual time varies. Factors like particle size, carbon-to-nitrogen ratio balance, moisture, heat, and frequency of turning all influence the speed. With optimal conditions, you can get “black gold” in a few months, but slower methods may take up to a year.
Conclusion
Composting stands as a powerfully simple act with profound environmental benefits and tangible rewards for any gardener. This guide, “Composting 101,” has illuminated the path from kitchen waste to nutrient-rich soil in just three months, proving that transforming organic waste is an achievable goal for everyone. By understanding the balance of greens and browns, maintaining proper moisture and aeration, and diligently troubleshooting common issues, you unlock the full potential of this sustainable practice. The journey from food scrap to “black gold” is not merely about waste reduction; it’s about fostering healthier soil, supporting vibrant plant life, and actively participating in a more circular and sustainable way of living. Embrace composting, and watch your garden (and the planet) thrive.


